Anaesthesia Logbook workflow
Clinical Fox can be used to maintain a comprehensive case logbook with flexible data capture, smart automation, and detailed analytics. Whether you're tracking cases for CPD requirements, audits, or personal records, Logbook Mode provides a streamlined interface focused on recording clinical details, while hiding Clinical Fox's billing fields and invoicing functionality.
If you only need Clinical Fox's anaesthetic logbook features, a reduced-price annual Logbook Subscription is available.
This guide walks you through using Clinical Fox as a case logbook, from enabling Logbook Mode to capturing detailed case information.
Quick Start Logbook Workflow
Enable Logbook Mode in Settings > General Settings to hide billing fields and show logbook-specific fields.
Tap the camera icon on the floating action button to photograph a patient sticker (demographics are captured automatically via OCR).
Enter the operation type (autocomplete learns from your previous entries).
Record Priority, Supervision, Mode of anaesthesia, and Physical Status as needed.
Add tags to mark notable case characteristics.
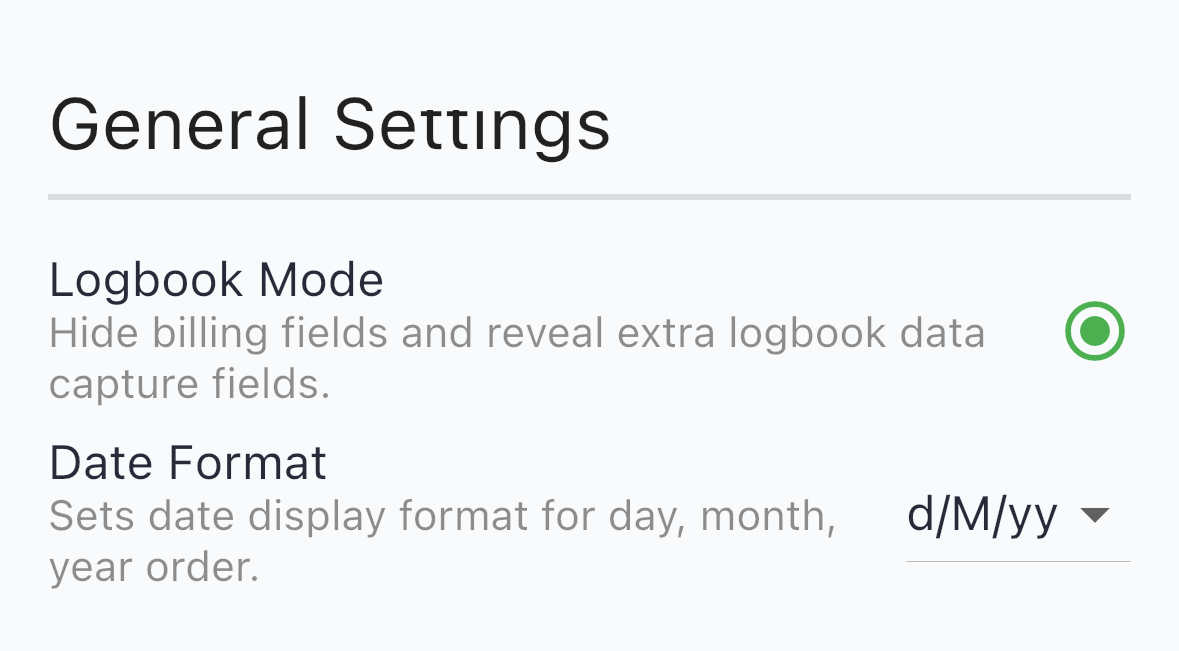
1. Enabling Logbook Mode
Logbook Mode optimises your interface for case logging by automatically hiding billing fields and revealing additional clinical detail fields in the case event details screen. You can also hide or show these fields manually at the time of entry.
How to Enable
Navigate to Settings > General Settings and toggle "Logbook Mode" on.
What Changes in Logbook Mode
The interface adapts automatically:
Hidden by default: Billing fields, MBS item number fields. (Although Item number fields can still be revealed if you want to track procedures by MBS item number, even in Logbook Mode.)
Shown by default: Priority, Supervision, Mode of anaesthesia, Physical Status (ASA classification).
App bar buttons: Changed to logbook-focused set including details summary, stickers, flagged cases, and active cases.
Slide action buttons: Changed to delete, flag, and private note options.
2. Creating a New Case
Clinical Fox offers multiple ways to create a case, optimized for different workflows.
Using the Floating Action Button

The floating action button (FAB) in the bottom-right corner of the home screen expands to reveal four options:
Add new event (+ icon, blue): Creates a blank case and opens the event details screen.
Add with note (notepad icon, amber): Creates a case and prompts you to enter a note immediately.
Add with start-time (clock icon, green): Creates a case and automatically stamps it with the current date and time.
Add with sticker (camera icon): Creates a case and immediately opens the camera to photograph a sticker.
Most users find the Add with sticker option fastest when working through a list of cases.
3. Capturing Patient Details with Sticker Photos
Hospital patient stickers contain most of the demographic information you need. Clinical Fox can photograph these stickers and automatically extract patient details using OCR (Optical Character Recognition). If you find the sticker format used by your hospital is not accurately scanned, let us know and we'll update our sticker algorithm.
Either from the home screen, tap the camera button, or from the event screen, tap "Add sticker image..." to photograph or select a sticker image from your device. Try to capture the sticker parallel to the camera lens without skew (ie. ideally you want all text lines of the sticker to run parallel to the edge of the camera viewfinder), then use the crop tool to capture only the sticker. (Any other text in the final captured image, or text showing through the sticker from the page underneath, will potentially confuse the OCR algorithm.)
OCR will run automatically on your device, extracting demographic, contact, surgeon and billing information if it is present.
Fields that were populated from OCR are visually highlighted so you can see what was captured and verify accuracy.
You can manually re-trigger OCR on any sticker image if needed, and manually define hospital and surgeon synonyms in Settings if required.
Platform Note: OCR is available on mobile platforms only, being performed wholly on-device. For this reason, the web version supports image upload but not automatic OCR extraction.
4. Record the Operation Type
The Operation field appears near the top of the event screen. This free-text field with autocomplete becomes smarter the more you use it. A dropdown menu will suggests operations based on your history, and pre-fill other fields such as item numbers and surgical specialty.
Each new operation you enter is remembered for future suggestions This means data entry speeds up over time as your most common procedures appear instantly.
Pre-Configuring Your Operation List
You can also pre-populate your operation suggestions list:
Navigate to Settings > "Edit suggested operations..."
Add your frequently performed procedures
These will appear as autocomplete suggestions immediately
This is particularly useful when you first start using Clinical Fox or want to standardize operation naming across your practice.
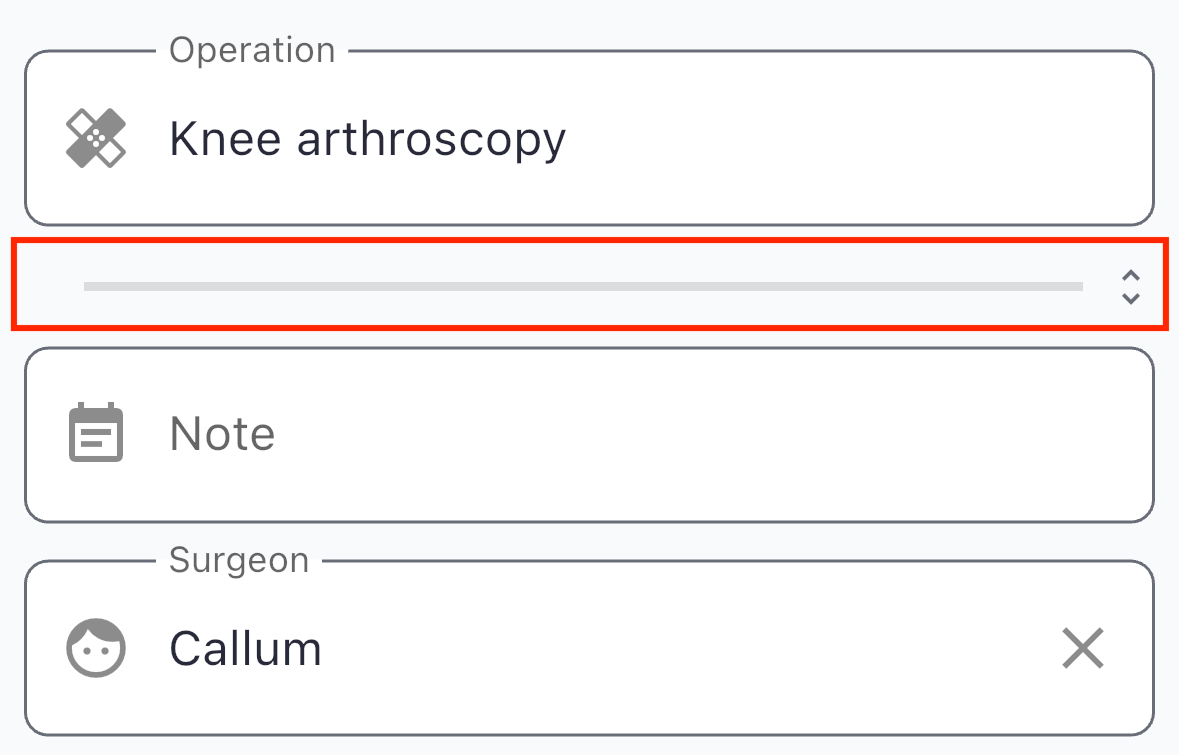
5. Logbook-Specific Detail Fields
These optional fields provide rich clinical detail for your logbook records. In Logbook Mode, they are shown by default. When Logbook Mode is off, they are collapsed behind an expandable divider (tap the expand icon to reveal).
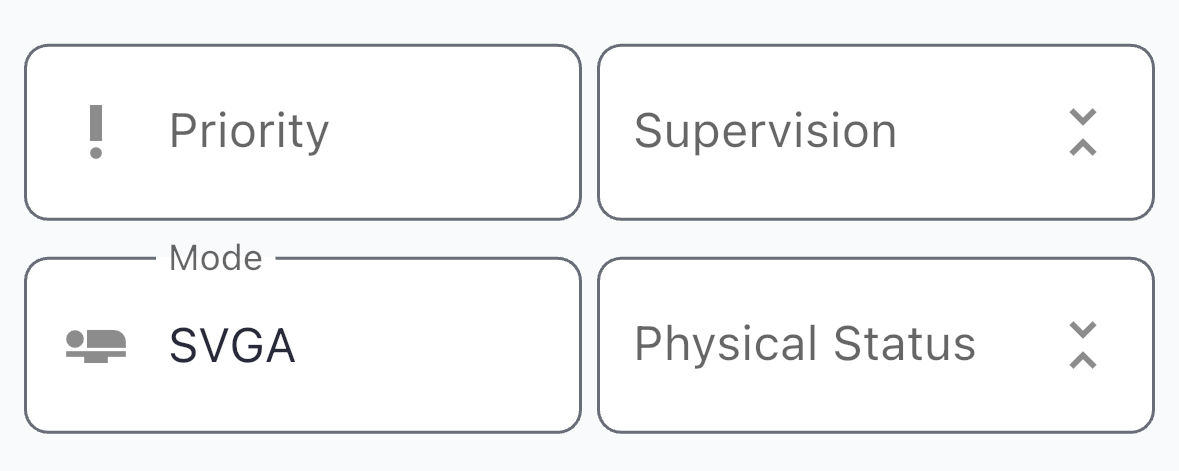
Priority and Supervision
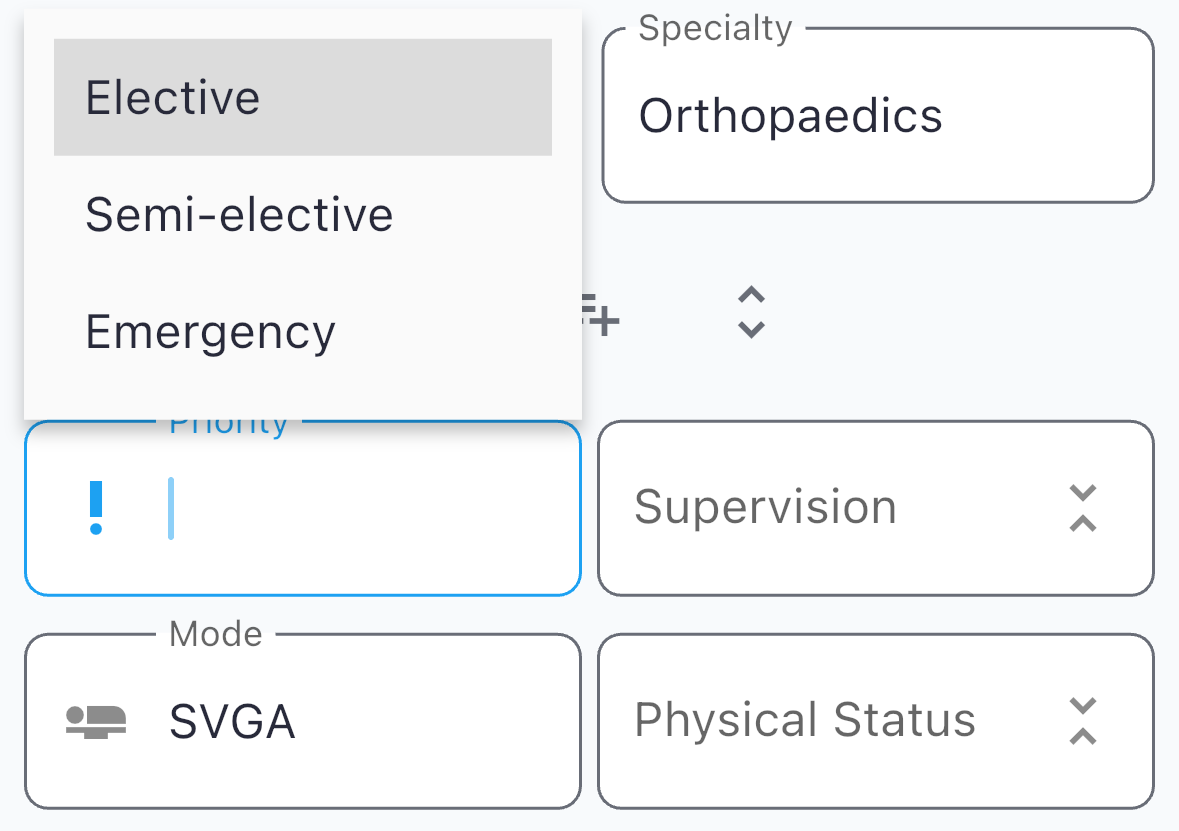
Priority records case urgency. Default suggestions include:
Elective
Semi-elective
Emergency

Supervision records the supervision level. Default suggestions include:
Level 1 — Immediate
Level 2 — Nearby
Level 3 — Onsite
Level 4 — Offsite
Mode and Physical Status
Mode (of anaesthesia) records the technique. Default suggestions include:
SVGA
Relax GA
Sedation
Spinal
Epidural
LA/Sedation
You can add new Modes directly in the field, or customise the Mode suggestions list via Settings > "Edit suggested anaesthesia modes..."
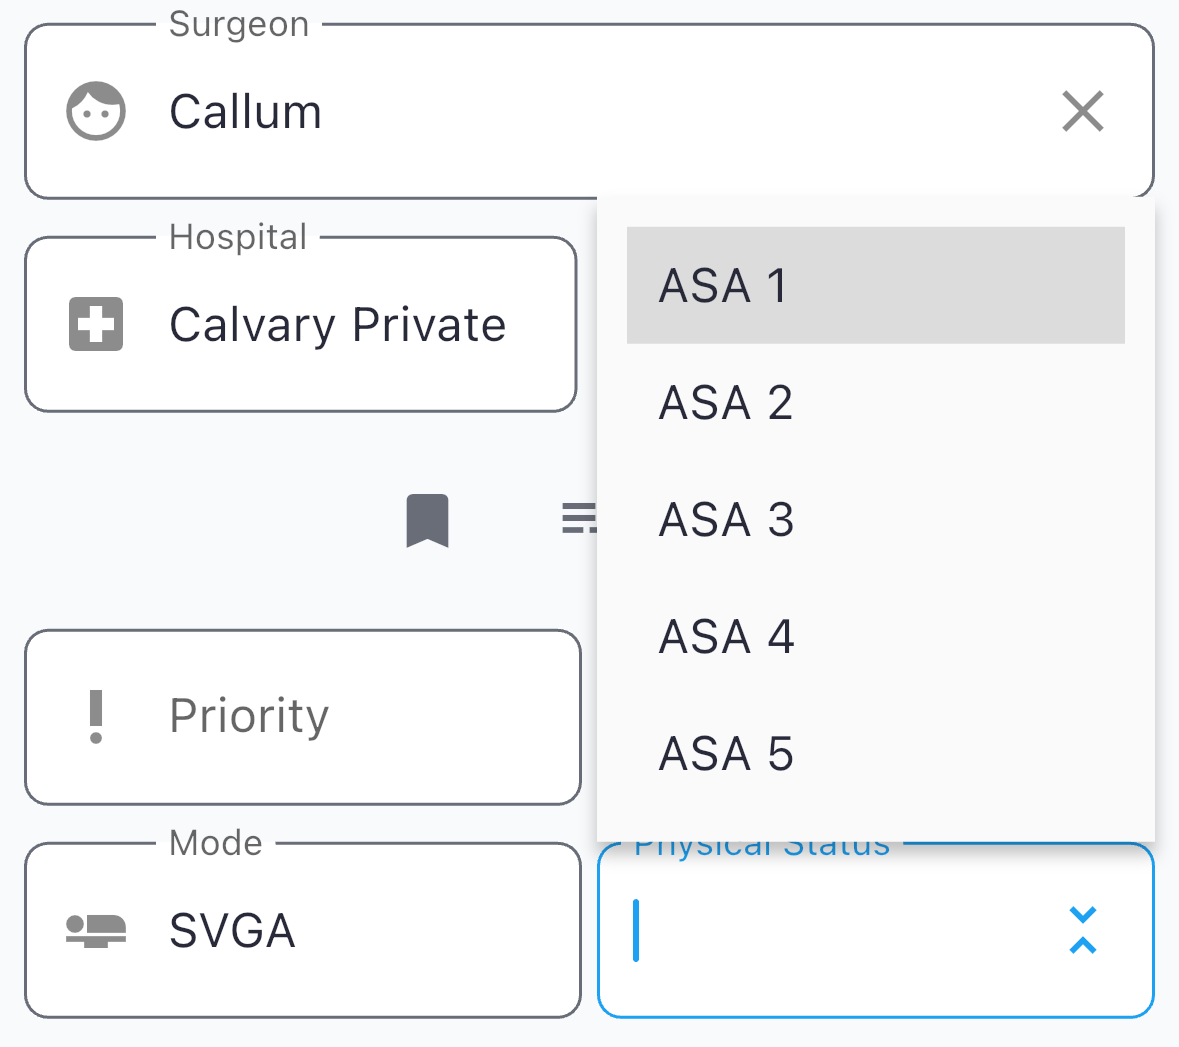
Physical Status (ASA classification) records patient health status. Default suggestions include:
ASA 1 — Healthy
ASA 2 — Mild systemic disease
ASA 3 — Severe systemic disease
ASA 4 — Systemic disease constantly life threatening
ASA 5 — Moribund patient not expected to survive without surgery
ASA 6 — Organ donor
Field Customization
All logbook fields are fully customisable, using autocomplete that will learn from your entries. You are not restricted to defaults. The fold/unfold icon on each row lets you show or hide these field pairs (preference is remembered).
6. Using Tags
Tags provide flexible, user-defined labeling for cases. They're excellent for marking cases with notable characteristics, complications, or techniques that you want to filter or report on later – whether that's patient characteristics and comorbodities, surgical or anaesthetic outcomes, marking cases for future review, or even procedures that your perform.
Tags can be used to track any extra information you desire.
The "Add Tags" field sits below the logbook detail fields and also features autocomplete.

Customizing Your Tag List
Navigate to Settings > "Edit suggested tags..." to customize your tag suggestions list. Add tags that are relevant to your practice, complications you want to track, or techniques you want to analyze.
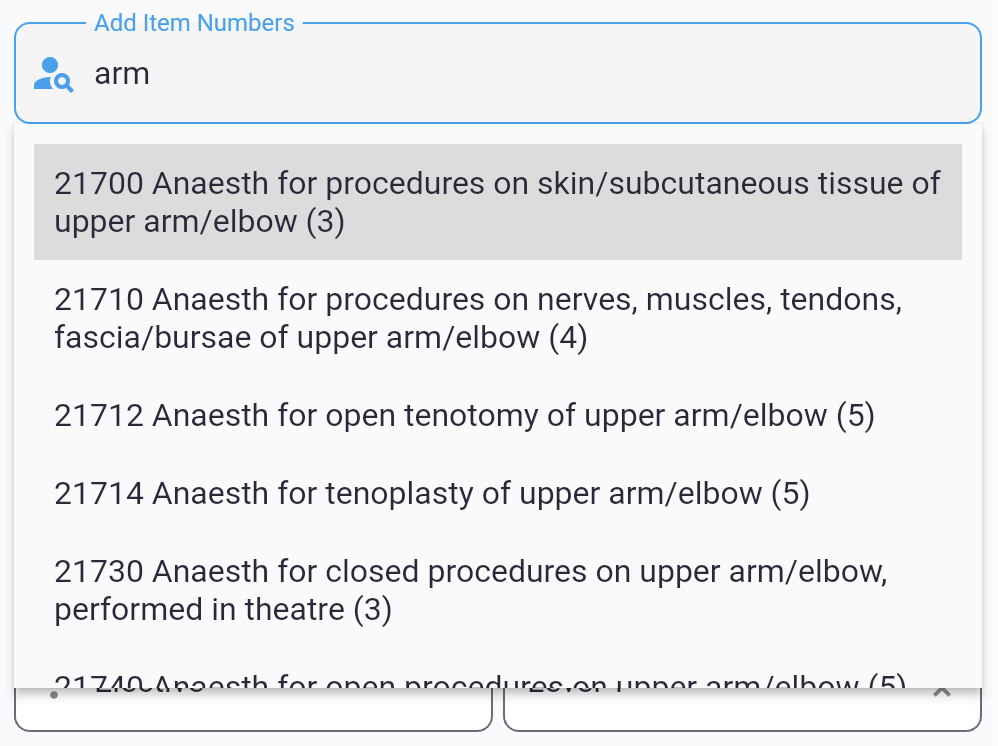
7. MBS Item Numbers (Optional)
In Logbook Mode, item number fields are hidden by default since logbook users typically don't track billing. However, you can reveal these fields if you want to track procedures by Australian MBS item number.
On the event screen, locate the clickable divider/expand control for the item numbers section and tap to reveal it:
Adding Item Numbers
Once shown, you can:
Search for and add MBS item numbers using the autocomplete field
Use quick-add buttons for frequently used item numbers (configured in Settings > "Quick Add Items")
Item numbers appear as chips with icons and can be removed by tapping
Even in Logbook Mode, tracking item numbers can be useful for procedure classification and statistical analysis without using the billing features.
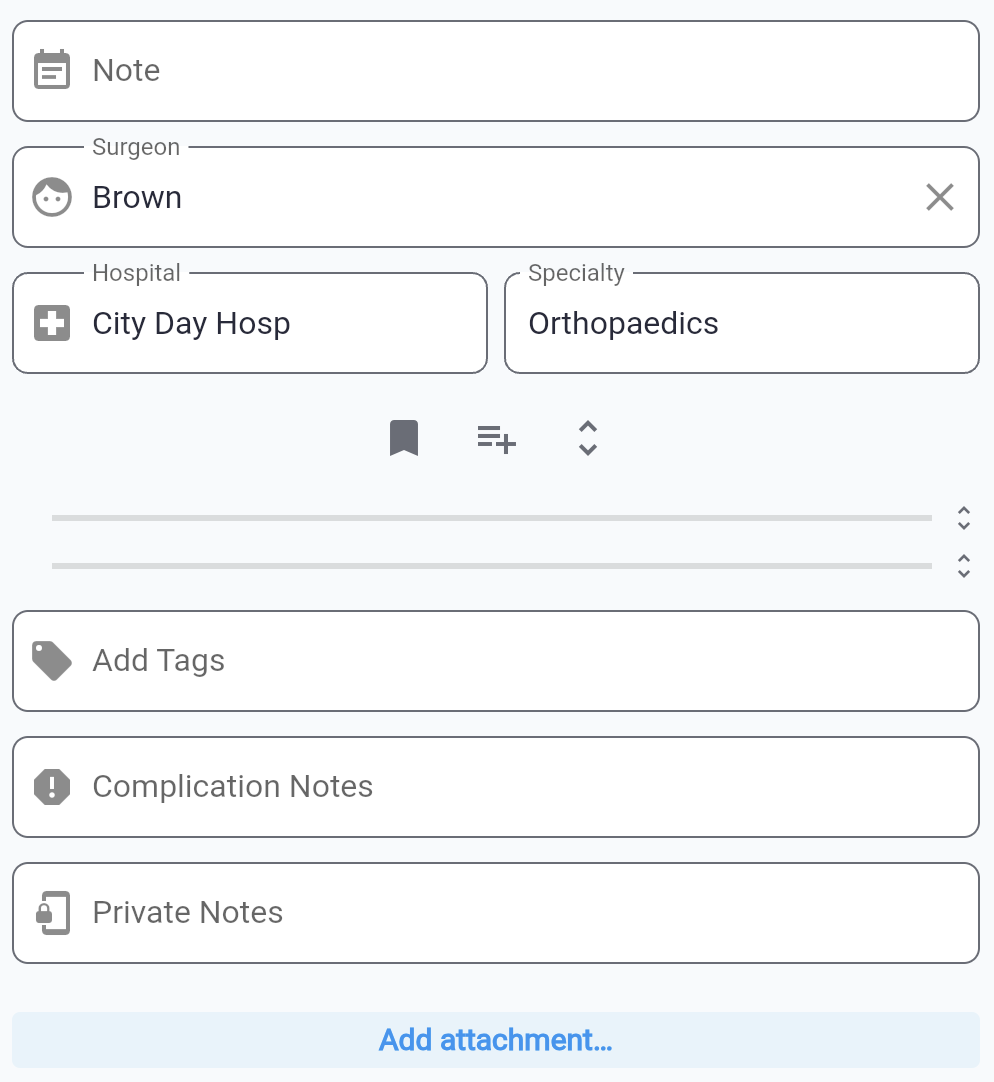
8. Additional Case Fields
Beyond the logbook-specific fields, the event screen provides additional fields for comprehensive case documentation:
Clinical Information
Surgeon: Surgeon name (autocomplete learns from previous entries).
Hospital: Hospital or facility name (autocomplete learns from previous entries).
Specialty: Surgical specialty (autocomplete learns from previous entries).
Note: General case notes and observations.
Complication Notes: Specific field for recording any complications.
Private Note: Notes that are not exportable and remain visible only to you.
Add attachment... Attach documents, monitor photos or other files to a case event record.
Timing Information
Start date and time: When the case began
End date and time: When the case concluded
Duration: Calculated automatically from start and end times
All fields with autocomplete learn from your entries, making data entry both progressively faster as you use the app, and data capture consistent across your cases.
9. What's Next
This guide covers the core logbook workflow for capturing case information. For information about analysing your logbook data, generating reports, exporting your cases, and running Patient Experience Surveys, see:
Patient Experience Surveys: Automatically run a Patient Experience Survey across a cohort of patients.
Logbook Statistics & Analytics (coming soon): Learn how to analyse your case mix, track trends, and generate insights from your logbook data.
Exporting Data (coming soon): Downloading your case data as CSV for external analysis or archiving, or create comprehensive PDF summaries.